Creating a Behavior From Scratch
In this tutorial we will implement and execute a simple behavior tree starting from scratch. By the end of it, you'll be familiar with every development step required for creating behaviors with AutoAPMS.
The full source code of the following examples can be found in the GitHub repository inside the package auto_apms_examples.
Implement a Simple Skill
We're going to create a simple skill that repeatedly prints a given text to the terminal. To achieve this using AutoAPMS and ROS 2, we need to implement an action server that performs the task of writing to the terminal and a separate client that is supposed to send a message specifying the goal of the action. You could approach this development task by sticking to the official ROS 2 tutorial for writing an action. However, we'd like to show you a more streamlined and modular approach enabled by AutoAPMS.
Action Interface
To define your ROS 2 interfaces, it's common practice to create a separate package that contains .msg, .service and .action files for topics, services and actions respectively. We name this package my_package_interfaces and create the following interface file:
# Request
string msg
uint8 n_times 1
---
# Result
float64 time_required
---
# Feedback
Server
For implementing robot skills using a ROS 2 action server, we provide the helper class ActionWrapper. The SimpleSkillServer shown below provides the functionality we want:
#include "my_package_interfaces/action/example_simple_skill.hpp"
#include "auto_apms_util/action_wrapper.hpp"

namespace my_namespace
{
using SimpleSkillActionType = my_package_interfaces::action::ExampleSimpleSkill;

class SimpleSkillServer : public auto_apms_util::ActionWrapper<SimpleSkillActionType>
{
public:
  SimpleSkillServer(const rclcpp::NodeOptions & options)
  : ActionWrapper("simple_skill", options) {}

  // Callback invoked when a goal arrives
  bool onGoalRequest(std::shared_ptr<const Goal> goal_ptr) override final
  {
    index_ = 1;
    start_ = node_ptr_->now();
    return true;
  }

  // Callback invoked asynchronously by the internal execution routine
  Status executeGoal(
    std::shared_ptr<const Goal> goal_ptr,
    std::shared_ptr<Feedback> feedback_ptr,
    std::shared_ptr<Result> result_ptr) override final
  {
    RCLCPP_INFO(node_ptr_->get_logger(), "#%i - %s", index_++, goal_ptr->msg.c_str());
    if (index_ <= goal_ptr->n_times) {
      return Status::RUNNING;
    }
    result_ptr->time_required = (node_ptr_->now() - start_).to_chrono<std::chrono::duration<double>>().count();
    return Status::SUCCESS;
  }

private:
  uint8_t index_;
  rclcpp::Time start_;
};
}  // namespace my_namespace

// Register the skill as a ROS 2 component
#include "rclcpp_components/register_node_macro.hpp"
RCLCPP_COMPONENTS_REGISTER_NODE(my_namespace::SimpleSkillServer)
All we have to do in the CMakeLists.txt of our package is to invoke this macro provided by rclcpp_components (assuming you add the server's source file to a shared library called "simple_skill_server"):
project(my_package)

find_package(ament_cmake REQUIRED)
find_package(rclcpp_components REQUIRED)
find_package(my_package_interfaces REQUIRED)
find_package(auto_apms_util REQUIRED)

# Create shared library
add_library(simple_skill_server SHARED
    "src/simple_skill_server.cpp"  # Replace with your path
)
ament_target_dependencies(simple_skill_server
    rclcpp_components
    my_package_interfaces
    auto_apms_util
)

# Register server component
rclcpp_components_register_node(simple_skill_server
    PLUGIN "my_namespace::SimpleSkillServer"
    EXECUTABLE "simple_skill_server"
)
# Allows you to simply start the server by running
# ros2 run <package_name> simple_skill_server

# Install the shared library to the standard directory
install(
    TARGETS
    simple_skill_server
    LIBRARY DESTINATION lib
    ARCHIVE DESTINATION lib
    RUNTIME DESTINATION bin
)

ament_package()project(my_package)
find_package(ament_cmake REQUIRED)
find_package(rclcpp_components REQUIRED)
find_package(my_package_interfaces REQUIRED)
find_package(auto_apms_util REQUIRED)
# Create shared library
add_library(simple_skill_server SHARED
"src/simple_skill_server.cpp" # Replace with your path
)
ament_target_dependencies(simple_skill_server
rclcpp_components
my_package_interfaces
auto_apms_util
)
# Register server component
rclcpp_components_register_nodes(simple_skill_server
"my_namespace::SimpleSkillServer"
)
# No executable file is generated. You must manually do that
# or write a launch script that loads this ROS 2 node component
# Install shared libraries to the standard directory
install(
TARGETS
simple_skill_server
LIBRARY DESTINATION lib
ARCHIVE DESTINATION lib
RUNTIME DESTINATION bin
)
ament_package()Client
Until now, we've pretty much only applied the standard ROS 2 workflow. This is about to change when we create the client for SimpleSkillServer. Very differently to what you're used to with ROS 2, the SimpleSkillClient in the following snippet does NOT inherit the interface of a typical rclcpp::Node. When using AutoAPMS, we prefer to implement clients as behavior tree nodes. In this case, it is a RosActionNode.
#include "my_package_interfaces/action/example_simple_skill.hpp"
#include "auto_apms_behavior_tree/node.hpp"

namespace my_namespace
{
using SimpleSkillActionType = my_package_interfaces::action::ExampleSimpleSkill;

class SimpleSkillClient : public auto_apms_behavior_tree::core::RosActionNode<SimpleSkillActionType>
{
public:
  using RosActionNode::RosActionNode;

  // We must define data ports to accept arguments
  static BT::PortsList providedPorts()
  {
    return {BT::InputPort<std::string>("msg"),
            BT::InputPort<uint8_t>("n_times")};
  }

  // Callback invoked to specify the action goal
  bool setGoal(Goal & goal) override final
  {
    RCLCPP_INFO(logger_, "--- Set goal ---");
    goal.msg = getInput<std::string>("msg").value();
    goal.n_times = getInput<uint8_t>("n_times").value();
    return true;
  }

  // Callback invoked when the action is finished
  BT::NodeStatus onResultReceived(const WrappedResult & result) override final
  {
    RCLCPP_INFO(logger_, "--- Result received ---");
    RCLCPP_INFO(logger_, "Time elapsed: %f", result.result->time_required);
    return RosActionNode::onResultReceived(result);
  }
};
}  // namespace my_namespace

// Make the node discoverable for the class loader
AUTO_APMS_BEHAVIOR_TREE_DECLARE_NODE(my_namespace::SimpleSkillClient)
Just like with the server, we must also add something to the CMakeLists.txt of our package to actually make use of the SimpleSkillClient node. AutoAPMS provides a CMake macro that makes it easy for you to register custom nodes with the ament_index, a core package of ROS 2 that allows installing resources which can be queried at runtime. The following assumes that you add the client node's source file to a shared library called "simple_skill_nodes".
project(my_package)

find_package(ament_cmake REQUIRED)
find_package(my_package_interfaces REQUIRED)
find_package(auto_apms_behavior_tree REQUIRED)

# Create shared library for the node
add_library(simple_skill_nodes SHARED
    "src/simple_skill_client.cpp"
)
ament_target_dependencies(simple_skill_nodes
    my_package_interfaces
    auto_apms_behavior_tree
)

# Declare client behavior tree node
auto_apms_behavior_tree_declare_nodes(simple_skill_nodes
    "my_namespace::SimpleSkillClient"
)

# Install shared libraries to the standard directory
install(
    TARGETS
    simple_skill_nodes
    LIBRARY DESTINATION lib
    ARCHIVE DESTINATION lib
    RUNTIME DESTINATION bin
)

ament_package()We use the term "declare a node" instead of "register a node" to avoid confusing this step with actually registering a node with a specific behavior tree. You will learn about the latter when we execute our application. For now, you should note, that declaring a node works very similar to what we've done with SimpleSkillServer.
| Type | C++ | CMake |
|---|---|---|
| Server | RCLCPP_COMPONENTS_REGISTER_NODE | rclcpp_components_register_node rclcpp_components_register_nodes |
| Client | AUTO_APMS_BEHAVIOR_TREE_DECLARE_NODE | auto_apms_behavior_tree_declare_nodes |
Create a Behavior
With both server and client implemented, we are done writing the low-level source code and ready to climb up the ladder of abstraction: We may now build our first behavior tree and actually employ the functionality we've just created!
Configure a Node Manifest
As you know, behavior trees are composed of nodes. When using AutoAPMS, all behavior tree nodes are plugins (except for the builtin/native nodes statically implemented by BehaviorTree.CPP) are loaded at runtime when the tree is created. To specify which node classes to load and how to instantiate them, you must specify so-called registration options. To reproduce this example, you don't need to know the details about this concept. Nevertheless, feel encouraged to check out the concept page for node manifests.
The node manifest for the behavior tree we're going to build looks like this:
SimpleSkillActionNode:
  class_name: my_namespace::SimpleSkillClient
  port: simple_skill

HasParameter:
  class_name: auto_apms_behavior_tree::HasParameter
  port: (input:node)/list_parameters
We want to include two custom nodes in our behavior tree:
SimpleSkillActionNode
This is the node that acts as a client to the
simple_skillaction we implemented above. As mentioned before, we need to include this node to send the action goal to the server.HasParameter
We additionally want to incorporate a node that allows us to determine if the tree executor defines a certain ROS 2 parameter, because want to support dynamically setting the message to be printed. This node is one of many standard nodes provided by the package
auto_apms_behavior_tree.
Before we're able to build our behavior tree, we must make sure that our node manifest will be available at runtime. This is achieved by registering one more ament_index resource using the NODE_MANIFEST argument accepted by the CMake macros auto_apms_behavior_tree_declare_nodes and auto_apms_behavior_tree_declare_trees. The following section defines the corresponding CMakeLists.txt. Visit the designated tutorial towards adding node manifests to learn more about the details.
Update the Client Package
You must modify the CMakeLists.txt of your package according to how you intend to create the behavior tree. We distinguish between two general approaches: You may either create a behavior tree graphically using a suitable visual editor or programmatically by incorporating the C++ API offered by AutoAPMS. The following shows the required configuration for both approaches:
You just need to add auto_apms_behavior_tree_declare_trees.
project(my_package)

find_package(ament_cmake REQUIRED)
find_package(my_package_interfaces REQUIRED)
find_package(auto_apms_behavior_tree REQUIRED)

# Create shared library for the node
add_library(simple_skill_nodes SHARED
    "src/simple_skill_client.cpp"
)
ament_target_dependencies(simple_skill_nodes
    my_package_interfaces
    auto_apms_behavior_tree
)

# Declare client behavior tree node
auto_apms_behavior_tree_declare_nodes(simple_skill_nodes
    "my_namespace::SimpleSkillClient"
)

# Declare simple skill tree
auto_apms_behavior_tree_declare_trees(
    "config/simple_skill_tree.xml"
    NODE_MANIFEST
    "config/simple_skill_node_manifest.yaml"
)

# Install shared libraries to the standard directory
install(
    TARGETS
    custom_nodes
    LIBRARY DESTINATION lib
    ARCHIVE DESTINATION lib
    RUNTIME DESTINATION bin
)

ament_package()Learn more 🎓
If you don't fully understand the CMakeLists.txt for the programmatic approach and want more detailed information about behavior tree build handlers, refer to the tutorial Building Behavior Trees: Programmatic Approach.
Build the Behavior Tree
Let's define an arbitrary example behavior which uses the functionality provided by our simple skill to print a message to the terminal a specific amount of times. The following rules apply:
If a custom message was specified using a parameter, use this. Otherwise, use a default message.
If a custom number of prints to the terminal was specified using a parameter, use this. Otherwise, only print once.
After both variables have been determined, execute the
simple_skillaction with the corresponding goal.To indicate that the behavior is finished, print a final message once.
For demonstration purposes, we implement this behavior using both the graphical and the programmatic approach:
The graphical representation of behavior trees is based on the XML format. So to define a behavior incorporating our simple skill, we must create a new .xml file from scratch. You can do that manually or run this convenient command that automatically writes an empty behavior tree to the given file.
ros2 run auto_apms_behavior_tree new_tree "config/simple_skill_tree.xml"TIP
Also consider using the corresponding VSCode Task which does the same thing.
➡️ Terminal -> Run Task... -> Write empty behavior tree
You must manually create an empty .xml file and open it before executing this task, since the current opened file will be used.
No matter how or where you create the behavior tree file, you'll probably need a visual editor for behavior trees. We recommend Groot2, because it's designed to be compatible with the behavior tree XML schema used by AutoAPMS and considered the de facto standard.
The graphical approach allows the user to quickly and intuitively configure the XML for the behavior tree For a step-by-step guide on how to build a behavior tree using Groot2, follow the link to the corresponding tutorial. Below, we provide the graphical and the XML representation of our example behavior tree:
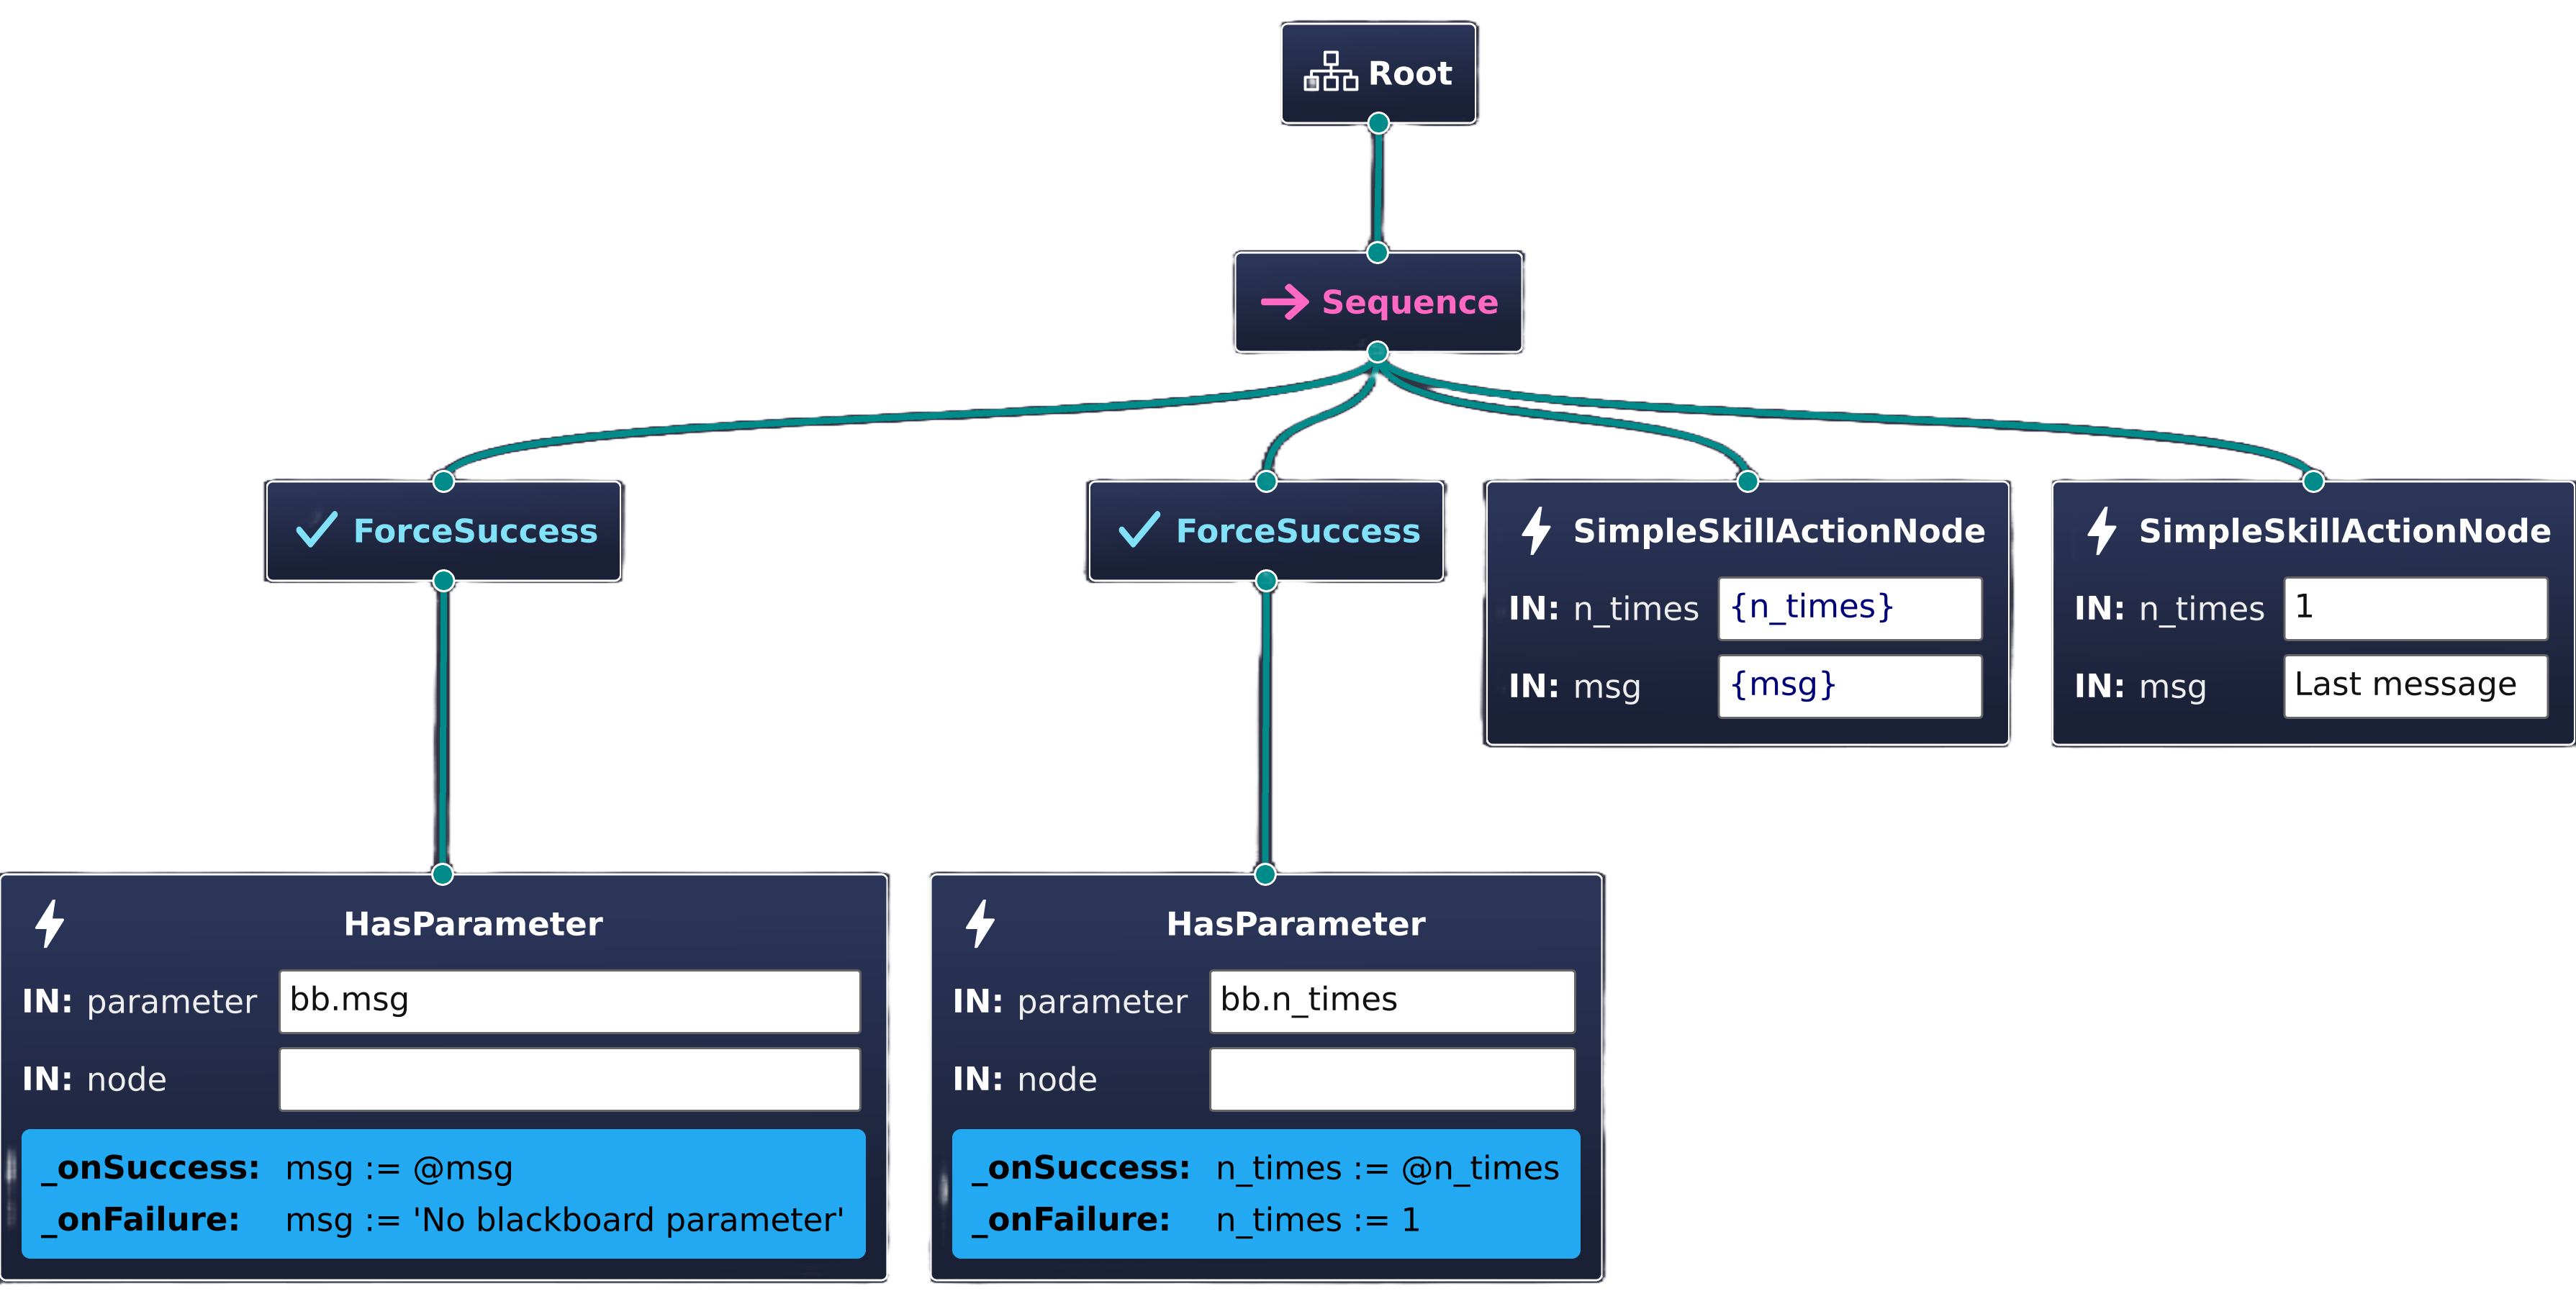
<?xml version="1.0" encoding="UTF-8"?>
<root BTCPP_format="4"
main_tree_to_execute="SimpleSkillDemo">
<BehaviorTree ID="SimpleSkillDemo">
<Sequence>
<ForceSuccess>
<HasParameter parameter="bb.msg"
node=""
_onSuccess="msg := @msg"
_onFailure="msg := 'No blackboard parameter'"/>
</ForceSuccess>
<ForceSuccess>
<HasParameter parameter="bb.n_times"
node=""
_onSuccess="n_times := @n_times"
_onFailure="n_times := 1"/>
</ForceSuccess>
<SimpleSkillActionNode n_times="{n_times}"
msg="{msg}"/>
<SimpleSkillActionNode n_times="1"
msg="Last message"/>
</Sequence>
</BehaviorTree>
</root>What are Global Blackboard Parameters?
This example behavior tree showcases a very useful concept introduced by AutoAPMS: Global Blackboard Parameters. They are accessed using the bb./@ prefix and allow us to adjust the behavior without rebuilding the entire tree, thus makes it reusable. This is one of the reasons why AutoAPMS's adaption of the behavior tree paradigm is very well integrated with ROS 2.
Congratulations! 🎉 You are now familiar with the general workflow of building behavior trees.
Deploy the Behavior
Finally, we're going to demonstrate how our simple skill and the behavior tree we've just created can be deployed. Make sure that you build and install AutoAPMS and your custom package which contains the source code for the example described above (we called it my_package before).
colcon build --packages-up-to my_package --symlink-installAutoAPMS conveniently provides an executable called run_tree which we will use as shown in Deploying Behaviors. To run the simple skill example, execute the following steps:
If you decided to create a behavior tree XML file using Groot2 (theoretically you could also do so manually), your behavior tree should be declared using the CMake macro auto_apms_behavior_tree_declare_trees. This allows it to be discovered at runtime. By default, TreeExecutorNode loads the TreeFromResourceBuildHandler when it is started, so we may execute any previously declared behavior trees by providing the corresponding resource identity:
ros2 run auto_apms_behavior_tree run_tree "<package_name>::<tree_file_stem>::<tree_name>"TIP
Also consider using the corresponding VSCode Task which does the same thing.
➡️ Terminal -> Run Task... -> Run behavior tree
Run the Example (Graphical approach)
Let us demonstrate the intended usage of run_tree for the behavior tree we created applying the graphical approach. AutoAPMS provides SimpleSkillServer, SimpleSkillClient and the example tree called SimpleSkillDemo with the package auto_apms_examples. Other than executing the tree, you must of course make sure that the server providing our simple skill is started as well.
Using only the terminal
Start the simple skill server in its own terminal:
ros2 run auto_apms_examples simple_skill_serverAfterwards, create a new terminal and start executing the behavior tree:
ros2 run auto_apms_behavior_tree run_tree auto_apms_examples::simple_skill_tree::SimpleSkillDemoUsing a launch file
Or you do both in a single launch file similar to this:
from launch import LaunchDescription
from launch_ros.actions import Node

def generate_launch_description():
    return LaunchDescription(
        [
            # Spawn the simple skill server
            Node(
                package="auto_apms_examples",
                executable="simple_skill_server"
            ),
            # Spawn the behavior tree executor for the simple skill tree
            Node(
                package="auto_apms_behavior_tree",
                executable="run_tree",
                arguments=["auto_apms_examples::simple_skill_tree::SimpleSkillDemo"]
            )
        ]
)ros2 launch auto_apms_examples simple_skill_launch.py approach:=graphicalModify the behavior using parameters
Remember that we configured the behavior tree so that we can adjust the behavior according to the parameters bb.msg and bb.n_times? They can be specified like any other ROS 2 parameter by either using the command line or a launch file. For example, run this:
ros2 run auto_apms_behavior_tree run_tree auto_apms_examples::simple_skill_tree::SimpleSkillDemo --ros-args -p bb.msg:="Custom message" -p bb.n_times:=10Or add the parameters inside the launch file:
from launch import LaunchDescription
from launch_ros.actions import Node

def generate_launch_description():
    return LaunchDescription(
        [
            # Spawn the simple skill server
            Node(
                package="auto_apms_examples",
                executable="simple_skill_server"
            ),
            # Spawn the behavior tree executor for the simple skill tree
            Node(
                package="auto_apms_behavior_tree",
                executable="run_tree",
                arguments=["auto_apms_examples::simple_skill_tree::SimpleSkillDemo"],
                parameters=[{"bb.msg": "Custom message", "bb.n_times": 10}]
            )
        ]
    )
Try out different parameters yourself!